rails authentication: authlogic to devise

Are you using authlogic for authentication purpose in your rails application and now want to switch to Devise?

Overview of Authlogic:

  user = User.find_by_email('test2@endpoint.com')
  actual_password = "password"
  digest = "#{actual_password}#{user.salt}"
  20.times { digest = Digest::SHA512.hexdigest(digest) }
  # compare digest and user.crypted_password here to verify password

Note that the stretches value for Authlogic defaults to 20, but it can be adjusted. Also note that Authlogic uses the SHA-512 hash function by default.
For password, it adds ‘password_hash’ and ‘password_salt’ columns, to store those encrypted values.

Devise: Devise uses ‘bcrypt’ algorithm and has ‘encrypted_password’  column.

Now the challenge was to migrate old users with their passwords, so that they can login with their existing email and password.

So its pretty much easy with following steps:

1. Have a look at devise documentation. Devise has provided a nice detailed documentation with proper steps and examples.
Devise Doc

2. In your gemfile

  gem 'devise',              '~> 3.2.4'
  gem 'devise-encryptable',  '~> 0.2.0'
  # Require the `devise-encryptable` gem when using anything other than bcrypt

3. From command-line

  rails generate devise:install

The generator will install an initializer which describes ALL Devise’s configuration options

4. For devise views:

  rails generate devise:views

5. In your config/initializers/devise.rb
To retain the old users with their login credentials (email and passwords) we will use the encryption algorithm ‘authlogic_sha512’

  config.stretches = 20
  config.encryptor = :authlogic_sha512

6. Migration for users to have devise authentication with ‘authlogic_sha512’ algorithm.
Here we will rename password_hash -> encrypted_password and few other columns

class AuthlogicToDevise < ActiveRecord::Migration
  def self.up
    add_column :users, :reset_password_token, :string
    add_column :users, :reset_password_sent_at, :datetime
    add_column :users, :remember_token, :string
    add_column :users, :remember_created_at, :datetime
    add_column :users, :authentication_token, :string
    add_column :users, :confirmation_token, :string, limit: 255
    add_column :users, :confirmed_at, :timestamp
    add_column :users, :confirmation_sent_at, :timestamp
    
    execute "UPDATE users SET confirmed_at = created_at, confirmation_sent_at = created_at"

    rename_column :users, :password_hash, :encrypted_password
    rename_column :users, :current_login_at, :current_sign_in_at
    rename_column :users, :last_login_at, :last_sign_in_at
    rename_column :users, :current_login_ip, :current_sign_in_ip
    rename_column :users, :last_login_ip, :last_sign_in_ip
    rename_column :users, :login_count, :sign_in_count

    remove_column :users, :persistence_token
    remove_column :users, :single_access_token
    remove_column :users, :perishable_token
    remove_column :users, :last_request_at
  end

  def self.down
    add_column :users, :perishable_token, :string
    add_column :users, :single_access_token, :string
    add_column :users, :persistence_token, :string
    add_column :users, :last_request_at, :AuthlogicToDevisemestamp

    rename_column :users, :encrypted_password, :password_hash
    rename_column :users, :current_sign_in_at, :current_login_at
    rename_column :users, :last_sign_in_at, :last_login_at
    rename_column :users, :current_sign_in_ip, :current_login_ip
    rename_column :users, :last_sign_in_ip, :last_login_ip
    rename_column :users, :sign_in_count, :login_count

    remove_column :users, :confirmation_token
    remove_column :users, :confirmed_at
    remove_column :users, :confirmation_sent_at
    remove_column :users, :authentication_token
    remove_column :users, :remember_created_at
    remove_column :users, :remember_token
    remove_column :users, :reset_password_sent_at
    remove_column :users, :reset_password_token
  end
end

7. Configure your user model with including the modules you want to have like Database Authenticatable, Confirmable, Rememberable etc. and add validations if required.

Thats it 🙂

Feel free to comment with your doubts or any suggestions.. Thanks.. 🙂
Don’t overuse $(this)

If you’re going to access the $(this) a lot, you might want to consider storing it into a local variable. So instead of something like this:

$('.items').each(function() {
    var pos = $(this).offset();
    var prevFloat = $(this).css('float');
    var prevZIndex = $(this).css('z-index');
    $(this).fadeOut();
    ...

You might want to consider changing your code to something more like this

$('.items').each(function() {
    var $this = $(this),
    pos = $this.offset(),
    prevFloat = $this.css('float'),
    prevZIndex = $this.css('z-index');
    $this.fadeOut();
    ...

This will increase performance speed so you don’t need to repeatedly create new jQuery objects

And using $ in front of the variable name denotes that it’s already a jQuery object

Daily Git Commands

The most useful commands to make your life more easier. Enjoy it and share with other developers.
Push at current branch
git push origin $current_branch
Return to previous commit, without saving changes.
git reset --HARD $SHA1
Watch remote branches
git remote show origin
Fetch a new remote branch
git fetch origin
Fetch remote branch
git checkout -t origin/$branch_name
Show all local branches
git branch -a
Create new branch from remote and switch it
git checkout -b $branch remotes/origin/$branch
Create a branch based over HEAD
git branch $branch
Create a new branch based at current
git checkout -b $new_branch $other
Delete local branch
git branch -d $branch
Delete remote branch
git push origin :$branch
Change name of branch
git branch -m $last_name $new_name
Copy a commint that you want to any branch
git checkout $branch
git cherry-pick $SHA1
Watch the local tags
git tag 
Add new tag
git tag -a v1.2 $SHA1
Upload tags to repository
git push --tags
Undo last commit without push it
git reset --soft HEAD~1
Undo last commit when we have done push
git revert HEAD
Upload partial commits. The changes don’t have added, they will remain in stage and after they will be added.
git add $file
git commit -m "Comment"
git stash
git pull --rebase origin $branch
git push origin $branch
git stash pop
list commits not pushed to the origin yet
git log origin/master..master
list remote branches that contain $commit
git branch -r --contains $commit
Undo last commit
git reset --soft HEAD^
Undo last changes. In this example, we gonna undo the last ten commits.
git rebase -i HEAD~10

git today: know your work

Do you want to know all your git commits from different repositories and even from different branches?

First, create this alias:

git config --global alias.today "log --since=midnight --author='John Roy' --oneline"

Here replace author name with yours.

You can avoid hard-coding your name as follows:

git config –global alias.today ‘!git log –since=midnight –author=”$(git config user.name)” –oneline’

Then, before leaving office for a well-deserved rest, you can reflect on what you’ve accomplished during your working day by issuing this simple command:

git today

That’s it 🙂

alertify.js : better alternative to browser dialogs

Do you want to show a success or failure alert message to User? looking for other than normal browser dialogs… Here is the perfect solution for you.. alertify.js

Link: Github, Download here

Features:

  • Easily Customizable
  • No Dependencies
  • Simple API
  • Cross browser and platform independent

Steps:

1. Inyour application.css file

*= require alertify.bootstrap
*= require alertify.core
*= require alertify.default

2. In your application.js file

//= require alertify

3. Display message on link click:

$('body').on 'click', '.my_click', (e) ->
  alertify.log "Welcome..!!"
  false

Default Dialogs

  • alertify.alert(“Message”);
  • alertify.confirm()
  • alertify.prompt()

Notifications:

  • alertify.log(“Message”)
  • alertify.success(“Success Message”)
  • alertify.error(“Error Message”)

Draw architectural design of the project using “railroady” gem.

Excellent Post would like to share..!!
Thanks Sunil 🙂

Ruby on Rails Knowledge

As a developer no one likes to write a complete documentation for a project. Butsometime we have to give some document which explain at least our architectural design of project.
If in future anyone else work on same project then he can easily understand the overview and business logic before look into the code.We should draw a simple architectural design of our project models, controller and their relationship.
There is a gem which provides all necessary diagrams – add it into development group.

 gem ‘railroady’

System Requirements

$ sudo apt-get install graphviz

run

$ rake diagram:all

It generates all diagrams contains structural design in the /doc directory.  If you have 100 model and controller in your app then Gemerated UML diagram is too much complex to view. So this gem provides some options like you can specify only those model for which you want to draw relationship.

This gem have lot…

View original post 29 more words

sunspot solr with rails

Links: Github (Explained nicely with examples)

Blog-links: blog-1, blog-2

Setting up Objects:

  • text fields will be full-text searchable. Other fields (e.g., integer and string) can be used to scope queries
class User < ActiveRecord::Base
  searchable do
    integer :id
    text :first_name
    text :last_name
    time :updated_at
    
    string :full_name, stored: true do
      "#{self.first_name} #{self.last_name}"
    end

    string :sort_name do
      self.try(:last_name) || ""
    end

    integer :sort_practice_id, stored: true do
      self.try(:practice_id)
    end

    string :practice_id_str, stored: true do
      self.try(:practice_id).try(:to_s)
    end
  end
end

After adding searchable block in your model, run reindex for model as

  • rake sunspot:solr:start (if not started before)
  • rake sunspot:reindex[,User]
all_users = User.solr_search do
  fulltext "myname"
  order_by(:sort_name, "desc")
  paginate page: 1, per_page: 25
end

Stored Fields

  • Stored fields allow data to be retrieved without also hitting the underlying database.
  • Stored fields come at some performance cost in the Solr index, so use them wisely.

# Retrieving stored contents without hitting the database
# Display full_name of searched users.

all_users.hits.each do |hit|
  puts hit.stored(:full_name)
end

Hits vs. Results

  • Sunspot simply stores the type and primary key of objects in Solr. When results are retrieved, those primary keys are used to load the actual object.
  • Using #results pulls in the records from the object-relational mapper (e.g., ActiveRecord + a SQL server)
all_users.results.each do |result|
  puts "#{result.first_name} #{result.last_name}"
end

To access information about the results without querying the underlying database, use hits:

# Using #hits gives back all information requested from Solr, but does
# not load the object from the object-relational mapper

all_users.hits.each do |hit|
  puts hit.stored(:full_name)
end

If you need both the result (ORM-loaded object) and Hit (e.g., for faceting, highlighting, etc…), you can use the convenience method each_hit_with_result:

all_users.each_hit_with_result do |hit, result|
  # ...
end

Grouping

Grouping is only supported on string fields that are not multivalued. To group on a field of a different type (e.g., integer), add a denormalized string type

grouped_users = User.solr_search do
  fulltext "myname"
  order_by(:sort_name, "desc")
  group :practice_id_str do
    limit 100
  end
  paginate page: 1, per_page: 25
end

all_groups = grouped_users.group(:practice_id_str).groups
all_groups.each do |group|
  users = group.solr_docs
  # users is array of hashes. Each hash represents user record with solr attributes
  # For ex: {"id" => "User 20", "full_name_ss" => "Harry Roy"}
end

Substring search with solr:
Solr supports default full-text search. Solr also supports sub-string search: refer this

Rails Best Practice and Refactoring

Currently reading book ‘RAILS ANTIPATTERNS’ by Chad Pytel and Tammer Saleh.
Its a good book identifies Rails code and design problems, explains why they’re bad and why they happen and shows exactly what to do instead.

Few points from this book, would like to highlight:

Mataprogramming:

It is a wonderful tool for producing DRY code in highly dynamic languages like Ruby.
Metaprogramming is commonly defined as ‘Code that reproduce Code’

DRY Principle:

The DRY Principle, which is consistently misunderstood, is fundamentally not about reducing lines of code.
The basis of DRY Principle, say Hunt and Thomas, is that “every piece of knowledge must have a single, unambiguous, authoritative representation within a system.”

Why Modules?

  • Simplest way of DRYing up your code.
  • Most Simple and Most Powerful
  • They give a developer all the benefits of using a common superclass.
  • They add to readability of your code by grouping and partitioning off different types of behavior.

Key Points:

  • Never build beyond the application requirements at the time you are writing code
  • If you do not have concrete requirements, don’t write any code
  • Don’t ump to a model prematurely; there are often simple ways, such as using booleans and denormalization, to avoid using adding additional models.
  • If there is no user interface for adding, removing, or managing data, there is no need for a model. A denormalized column populated by a hash or array of possible values is fine

Integration of Google Maps in Rails Application

Let’s have a look into some more details:

Link: Gmap4rails PPT, Documentation 

Cluster:
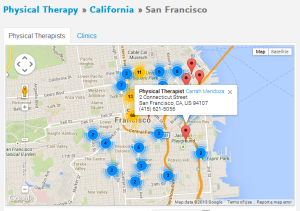
Cluster can be used to avoid overlapping of multiple pins and display the number of locations within the area.

Cluster attributes:
1. do_clustering :              To cluster markers, default to false
2. clusterer_gridSize:        The more the quicker but the less precise, default to 50
3. clusterer_maxZoom:     Define at which zoom level clusterer is disabled, default to 10

cluster

Example:

= gmaps("markers" => { data: json, options: {clusterer_gridSize: 25, do_clustering: true, clusterer_maxZoom: 20} })

Callback:

Ex.  Set zoom-level to 13 if map shown with full zoom out

- content_for :scripts do
  %script{:type => "text/javascript"}
    Gmaps.map.callback = function(){
    google.maps.event.addListenerOnce(Gmaps.map.serviceObject, 'idle', function(){
    / set zoom-level
    var zoomLevel = Gmaps.map.serviceObject.getZoom();
    if (zoomLevel > 13) {
    Gmaps.map.serviceObject.setZoom(13);
    }
    }
    )};

Some issues with gmaps4rails:

1. Full zoom-out for single pin
Solution: on map-load check the zoom-level and adjust accordingly using setZoom()
(as shown above in callback example)

2. Display only latest for multiple locations at same place
Solution: create group of such locations and add while creating info-window for that location include the info of all those grouped locations

Basic Integration of Google Maps in Rails Application

Want to display Google-map in your Rails Application? You can do it easily with Gmap4rails gem.

Links: Github, Gmap4rails-Version-1, Basic-Steps

STEPS:

  1. In your gemfile
    gem 'gmaps4rails', '~> 1.5.6'
  2. Copy the assets to your app (and be sure to copy the fresh assets when you upgrade the gem): 
    rails generate gmaps4rails:install
  3.  In you application.js file 
    //= require gmaps4rails/gmaps4rails.base
    //= require gmaps4rails/gmaps4rails.googlemaps
  4.  In your layout file, views/layouts/application.html.haml 
    = yield :scripts
    %script{type: "text/javascript", src:"http://maps.googleapis.com/maps/api/js?sensor=false"}
  5. Add CSS for map container as follows: gmap.css
    .map_container {
      padding: 6px;
      border-width: 1px;
      border-style: solid;
      border-color: #ccc #ccc #999 #ccc;
      -webkit-box-shadow: rgba(64, 64, 64, 0.5) 0 2px 5px;
      -moz-box-shadow: rgba(64, 64, 64, 0.5) 0 2px 5px;
      box-shadow: rgba(64, 64, 64, 0.1) 0 2px 5px;
      width: 735px;
    }
    .gmaps4rails_map {
      width: 720px;
      height: 427px;
    }
  6. Require the above CSS file in your application.css file
    *= require gmap

Basic Configuration:

MODEL:

Consider we have User model, which has fields latitude, longitude, address, city, state.
Gmap4rails gem also provides geocoding, but it is better to use geocoder-gem for geocoding the user’s location. Then in that case you can set :process_geocoding => false

  acts_as_gmappable :process_geocoding => false
  def gmaps4rails_address
    [address, city.titleize, state].reject(&:blank?).join(', ')
  end

If your model don’t have the latitude and longitude and if you going to used it from its other associated model then either you can delegate those fields or add instance methods for it.

CONTROLLER:

In your controller, add following:

@users = User.scope_method # select the users to display on map
@json = @users.to_gmaps4rails

If you want to customize the picture of marker or content of info-window then use following:

@users = User.scope_method # select the users to display on map
@json = @users.to_gmaps4rails do |user, marker|
  marker.infowindow render_to_string(
    :partial => <custom-info-window-content-partial-path>,
    :locals => { <partial-locals-variables> })
  marker.picture { :picture => <marker-picture-file-path> })
  marker.json({ :id => user.id })
end

VIEW:

= gmaps("markers" => { data: @json })

Thats it..!! 🙂